Companion Resource

Hands-On With Wool
Spinning, dyeing, weaving, and felting wool can easily be done in the classroom. This activity provides instructions and a materials list, making it easy to prepare a hands-on wool project for your class. Wool processing is a topic that connects easily to lessons in history and science.
Materials
Activity 1: Spinning the Wool
- Carded wool 1/4'' x 14'' (6.35 mm x 35.56 cm), 1 per student
- Spinning hooks, 1 per student
- Carded wool and spinning hooks are available for purchase in a Wool Spinning Kit
Activity 2: Kool-Aid Dye Method
- Wool; cut to one arm’s length
- 1 Tbsp vinegar (15 mL)
- 1 cup water (240 mL)
- Glass bowl
- Microwave
- Kool-Aid
Activity 3: Natural Dye Method
- Wool; cut to one arm’s length
- Natural plants for dyeing
Activity 4: Weaving the Wool
- Cardboard
- String
- Spun and plied wool
- Spinning hook from the Wool Spinning kit (see activity 1 materials)
Activity 5: Felted Wool Marbles
- 2" x 2" (5.08 cm x 5.08 cm) pieces of dyed wool, 1 per student
- Bowl of warm, soapy water
Activity 6: Ziploc Felting
- Natural and dyed wool
- Tulle fabric
- Sandwich-size resealable bags, 1 per student
- Soapy water
Procedures
Activity 1: Spinning the Wool
- Give each student a piece of carded wool approximately ¼" (6.35 mm) wide and 14" (35.56 cm) long. Fold about ½" (1.27 cm) of wool over the end of the spinning hook and begin spinning.
- Back your non-spinning hand out as the wool is spun; this is called drafting.
- Draft out the wool so that the spun wool is taut but not bumpy. If you get twisted bumps in your spun yarn, let out more unspun wool. When you have twisted the entire length of the wool, don’t let go—it will unspin. You are now ready to ply your yarn.
- Plying the yarn will keep it from unspinning and make it stronger. Plying is the twisting together of two single strands of spun wool. Have someone hold the center of the twisted wool while you hold the ends.
- Bring the ends of the wool together in one hand so that there are two strands side-by-side. Have your helper let go, and let the wool twist together. It should spring into a twisted strand. The double strand is now called plied yarn.
- Tie the plied yarn around your wrist to form a friendship bracelet.
Note: You can view a demonstration of the wool spinning process.
Activity 2: Kool-Aid Dye Method
- In a glass bowl, combine 1 package of Kool-Aid, 1 cup (240 mL) of water, and 1 tablespoon (15 mL) of vinegar. Stir until the Kool-Aid completely dissolves.
- Completely immerse an arm’s length of wool into the Kool-Aid mixture.
- Place the bowl of wool and Kool-Aid mixture into a microwave. Heat on high for two minutes.
- Remove the bowl from the microwave and allow to cool. BE CAREFUL, IT’S HOT!
- After the mixture has cooled, squeeze the liquid out of the wool and into the bowl. If the liquid is fairly clear, rinse the wool in cold water. If the liquid is not clear, heat the bowl of wool and Kool-Aid mixture for one additional minute before cooling and rinsing. This process will result in dyed wool that you can allow to dry and use in other projects.
Activity 3: Natural Dye Method
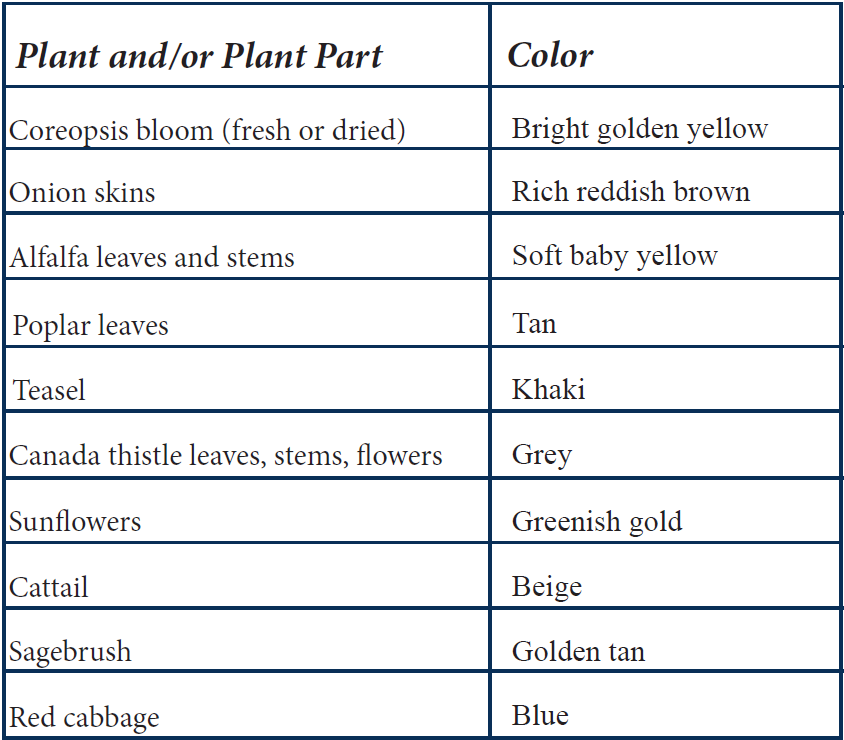
- Select and chop the plant material. For a list of plants and their resulting colors, see the table below. About one pound (480 g) of plant material will produce satisfying color on about a half pound (240 g) of wool.
- Cover the chopped plant material with water. Simmer for about an hour to allow the natural pigments to color the water.
- Strain and discard the plant material (cheesecloth works well), and add pre-dampened wool to the liquid. You may have to add more water at this stage so that the wool is completely immersed.
- Simmer for another hour or until the wool is the desired color.
- Rinse in cold water.
Note: A mordant is a chemical that opens up the fiber so it bonds more easily with the dye, and produces a more vivid color. You may choose to add a mordant to the dye bath or use it on the wool before dyeing. However, most mordants (copper, tin, chrome, iron) are quite toxic. Alum or vinegar, both available at most grocery stores, can be used safely. Mordant is derived from the Italian word “mordere,” which means “to bite.” The colors will bite and be more intense if a mordant is used. In order to experiment with plants and color, give your students a piece of white poster board and instruct them to scrape a leaf or flower across the card. The resulting stain is a good indication of the color the plant will produce when used as a dye.

Activity 4: Weaving the Wool
- Cut a rectangular piece of cardboard to your desired size. We used a 5" x 5" (12.7 cm x 12.7 cm) piece. This will become your loom.
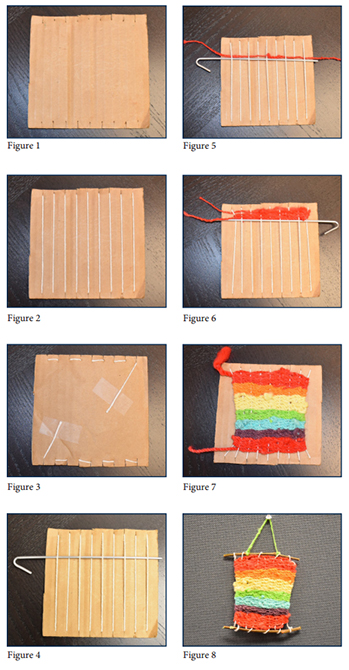
- Use scissors to cut 1/4" (.635 cm) slits 1/2" (1.27 cm) apart along two opposite ends of the cardboard (see Figure 1).

- To create the warp on the loom, tape one end of the string to the back of the cardboard. Then string it through the first notch, around the front of the cardboard piece from top to bottom and into the opposite notch. Continue until all of the notches have been filled. Tape the second end of the string to the back of the cardboard (see Figures 2 and 3).
- Tie several strands of the spun and plied wool from activity one together to make one long piece.
- Use the spinning hook from the wool spinning kit as your shed stick. A shed stick is a tool used to create a temporary separation between the warp yarns. Feed the shed stick over and under the warp with every second string being raised (see Figure 4).
- Weave the yarn across the loom following the pattern of the shed stick. This yarn is known as the weft. To weave the second row, feed the shed stick in the opposite over under pattern from the previous row and follow the pattern with the yarn. Use the shed stick to gently push each row together. Repeat this process until the weaving is finished (see Figures 5 and 6).
- When the weaving is finished, insert a twig or dowel above and below the woven piece. Detach the strings from the cardboard notches and tie the loose ends to the twigs. An extra piece of yarn can be tied to the top twig for hanging (see Figures 7 and 8).
Activity 5: Felted Wool Marbles
- Separate the fibers from a 2” x 2” (5.08 cm x 5.08 cm) piece of dyed wool until you have a puff of wool.
- Lightly and gently roll the wool in your hands to create a loose ball.
- Dip the wool into warm, soapy water.
- Roll the wool between your palms in a gentle but quick circular motion. Do not press or squeeze the wool.
- Continue rolling until the wool starts to stick together and looks like felt. This should take about five minutes.
- Allow the marble to dry.
Activity 6: Ziploc Felting
- Cut a rectangular, flat piece of wool small enough to fit inside the resealable bag.
- Create a design by layering dyed wool on top of the rectangular piece.
- Place rectangular pieces of tulle on the top and bottom of the wool. This will help speed up the felting process.
- Place the wool and tulle inside the bag.
- Pour enough soapy water into the bag to completely saturate the wool.
- Place the bag flat onto a towel.
- Squeeze the excess water out of the bag by pressing with your hand from the bottom of the bag to the top.
- Seal the bag and work the wool by poking and pounding with your hands from the outside of the bag until the wool becomes firm and felt-like.
- After the wool has felted, remove it from the bag, discard the tulle, and gently rinse in water, alternating hot and cold.
- Roll the felt in a towel to squeeze out any excess water. Lay flat to dry.